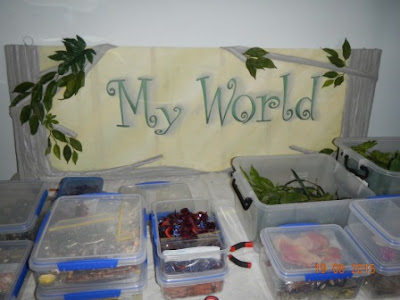
The base of this sign is a large piece of core flute - the stuff that is used in real estate signs. Now because this stuff is plastic it doesn't actually like glue so you need to go a bit nuts with a sharp blade and slash it so that the glue will stick it self to the rough edges. I spread glue all over the base and waited until it was a bit sticky (hopefully preventing from to much of the glue from coming through the fabric to the front. I then placed the fabric on it and using my hands made sure that there were no air bubbles as I pressed it together.
Once you have done that I used material for the background.

As can be see in the photo there is a chain that I have attached around the whole sign. I have done this on both ends. This will be covered by the tree trunks made of hessian and will allow me to hang the sign. If you would like to read more please click here.
Now another thing you can see is some faint shadows of tree trunks ( in grey) and I have slanted some green and yellow watered down paint from left to right rising from the bottom of the sign to the top.
The next this you can see are the words My World. Now here I cheated. I went onto the computer and in Powerpoint I found a font I like and printed off the worlds on plain white paper. I then cut each letter out. I then measured up from the base and using a straight edge of a piece of wood I was able to draw a straight faint line so I could make sure the words wood be level. I then glued each letter onto the base.
I then painted over the paper letters and created a shadow effect using a soft brush with grey paint. I ended up putting a line edging around each letter to make the letters stand out. I glued over the letters again to make sure they would not come off and protect them from scratches. I glued to just 1mil off the edge of the paper.
While that was drying I ripped up some light weight hessian into strips and soaked them in a solution of half water and half PVC glue.
Once the painted words were dry I covered them with cling wrap to protect them and then started to lay the wet hessian onto the board.
When doing that don't have it wringing wet with the watered down glue. Squeeze most of it out but not so much that it is almost dry otherwise it will not stick to the fabric.
I then laid strips of wet hessian down to form a tree trunk. I sometimes folded the strips so there was some form to the 'bark'. I also added branches. You can see that I have gone over the chain. I did this on both ends of the sign to cover it up and make it more secure.
  |
I then glued the wet hessian onto the base and then painted it grey.  |
In the boxes are a selection of all the different 'thing's I make to add to my hanging houses.
 |
| This is a selection of items I have made and fake leaves. |
 |
| This is my little bug. It is not finished yet but I thought you might like to see it. The purple body is made from a plastic spoon with purple wool glued over the base. The white wings are made from bubble wrap that has been ironed. The wings and the head are made from a white plastic spoon. The decoration on the wings and head are made from nail polish. If you would like to look at a YouTube that shows you what I mean click here. Move to 2.30 on the YouTube to see what I am talking about. |


No comments:
Post a Comment