Showing posts with label Making Models. Show all posts

Tuesday, 5 September 2017

Gold Coast Show 2017 - What I Made

At the Gold Coast Show 2017 and what I made there

When I am at any show I like to make something. This time I was able to make the base of the wooden decking (is that what it would be called?) that surrounded the hanging house I am working on.
What I did first was nail and glue small sections of square balsa wood to the gourd creating an edge. I did this until the complete base was circled with them. I then cut pieces of flat sheet balsa wood so that it would radiate out from the gourd. These were nailed and glued to the edging. I then nailed and glued the sheet edging to more square balsa wood so that the outer ends of the decking were supported.
Once the wood work was completed I then covered the whole lot with hand made paper. I loved the texture and will colour it later.
Once that was finished I then worked on the windows.
This is the first version of the rubber bands used. I thought them too bright so changed them to the lighter colour.
The white stuff is the glue that has not dried yet. The base as the window is made from sequins covered in micro beads.


Friday, 26 May 2017

Using Strip Lights

USING STRIP LIGHTS
I think I have mentioned, more than once that, lights are the bane of my life. I realise it is my own fault, I keep changing things but what else would you expect from a person like me.

I decided to use strip lights because I wanted, and still do want to make, lit mushrooms and they use individual strip lights* so I went looking for some. Well there's a pickle. As with everything nothing is as simple as it seems. It turns out there are not just one type, no that would be too easy, there are stacks, some really tiny, tiny. If you want to know more info click here and it will take you to a website that explains it a lot better than I ever could.
If you would like to read about the reason and how I changed the LED lights in Pebble Cottage to Strip Lights click here.

Monday, 21 November 2016

How to Wire Strings of Micro Leds

For those of you coming back to this post please note I have reduced the resistor from 36 Ohms to   15 Ohms for 200 lights or less.

The first thing I would like to say is that I have put this extensive post on my blog, on how I wired this particular board in my model, for three reasons. One, I have a head like a sieve. I do soo much stuff that I forget what I am doing. This way I can come back on it and go "Ah ha! Is that what I did!" The other reason is that when I was young, and attempting to learn all of this stuff, I had to figure it out by myself because no one would tell me. It took years! I suppose their idea was that it had taken them so long to figure it out why should they just give the information away for free? In one way I don't listen that, on another, I can understand it. So you can use this information, although I take no responsibility if you follow it and it does not work, for free BUT I would really appreciate it if you could link back to my blog. Also, in the future, I am going to do an e-book on how my models were made and this is a good start, although I think I might add videos to that.
This is the effect that I was aiming for and I am very pleased with it.
The second thing I need to say is that I am NOT an electrician and so I have wired these micro LEDs as a novice. This works for me but if you are going to follow in my footsteps and have any reservations please contact an authorised electrician. Always be careful when dealing with electricity.

I have probably said this before in other posts but I will say again - wiring lights are the bane of my life. There are soo many ways to wire lights and it can really become a very complicated thing. As I am not a person for complication I  believe I (after all these years) I have figured out a simple way for me to use LED lights within my model.

I am presently going through Pebble Cottage changing the lights. It is a model that is approx 20 odd years old and was filled with 'rice bulbs'. These chew up a large amount of power to run and so I have been methodically going through each section (7 of them) and changing them to LEDs.

I am using two types of LED's. The first are the individual 3mil and 5mil bulbs. These are mainly used inside the houses. The other type is the fantastic strings of micro LED's (Fairy Lights) with an added decoration over the top. Later I will be using the tape LED's for the fungi I want to light up and using Optic Fibre within the model.

I am also making it so the models can run on battery and also mains power through a 12v transformer which means that the 3mil & 5mil LED's can run on both sources of power. The micro LED's can only run on 4.5v batteries for the moment.

This is a lengthy post so if you would like to read more please click on the Read More link below.

Thursday, 6 October 2016

Using Strings of Miniature LED's

Using Strings of Miniature LED's
When it comes to my models I have found the WOW factor through the day BUT at night they are a real let down. Not anymore!
Lighting has always been the bane of my life when it comes to these models of mine BUT I have finally found the solution.
For your information - Internal lights are included as the image shows. If you would like to read more articles about how I have lit up the models please click here and scroll down past this post.

If you would like to read more of this post please click on the Read More link below.

Friday, 12 June 2015

Glow in the Dark Paint

Using glow in the dark paint is easy once you have all the right materials. It's sorting that part out that's the tricky bit.

      After looking for months on the Internet and You Tube I decided to purchase a 'starter pack' from Glow Paint Industries here in Queensland.
      The starter pack came with eight 50gram packets of the following colours in powder form:-
Aqua- night colour - day colour is lemon, Pink, Green- night colour - day colour is lemon, Blue -night colour - day colour is lemon, Orange, Purple -night colour - day colour is white, Blue & Peach.

     Using the image below I will explain a few things about the powders.

When I can I will supply a photo of what this looks like in the dark.
  First, next to the splotches of colour is a pile of powder. This is to show you what the difference is in the colour from day colour and a night colour. The colour of the powder is the day colour. This can change slightly depending on the product you use to mix it with.

     When it comes to the blue, pink, peach and yellow I mixed it with some Polyurethane from Jo Sonja's Opal Dust as it was all I had at the time and I'm an impatient person and wanted to try it now, today, yesterday type of thing. 
     As you can see the powder (when mixed has darkened.) When I mixed it with Cabot's Cabothane Clear I was most disappointed. This is because the product has a grey/brown tinge to it. I used this product because I was attempting to save money and didn't know at the time that it had this tinge. It NEVER works. I've just cost me more money as I shall be going (as soon as I finish this blog) to purchase some crystal clear Polyurethane as I should have done in the first place and see how that goes. 

(I'm back. I could not get what I wanted but have purchased Derivan Matisse Polyurethane Satin Varnish which is white but dries clear and flexible. I have also purchased Winsor & Newton Artists' Acrylic Gloss UV Varnish. This is because I was told the polyurethane (if left in the sun) would eventually yellow and this is suppose to stop that from happening. I will need to experiment to see how it goes with the Glow in the Dark Paint.)
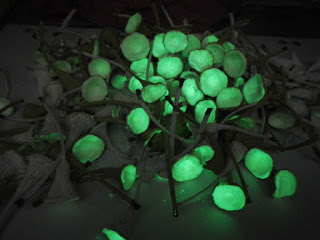


      These two images show you some gumnuts I am colouring at the moment. The bottom image shows white painted gumnuts. (I'm considering changing to Gesso as the white paint of choice, needs experimenting with. This is because I have found that using a house paint is to thin and needed two coats of paint. I also found that when I put the Glow In the Dark paint on (using the polyurethane that the very rim of the gumnut has bled some brown into the paint. It looks effective and I will enhancing the effect for the day light colouring of the fungi.) This is just a base colour I always paint over my gumnuts before I colour them with some other colour in this case green moss from Jo Sonja paints..


As it turns out the company supplying the powder recommends that it should be painted onto a white back ground and that you paint two coats of the powder. They also recommend not mixing the powders together as they say it gives the colour a muddy look.
      If you look at the inside of some of the green painted gumnuts you can see (in the image to the left) a pale yellow. Look to the top image and you will see that that is the 'green glow in the dark paint'. These gumnuts (for the sake of taking a photo of them) had a torch light held up to them for about a minute or two. Also this green powder glows in shadows where others (like puple, which is more like a pale white, only glows in pitch darkness.)
     Glow in the Dark Paints 'glow' because some source of light has been shining on them for a while. The company recommends that this should be done for 30mins to ensure that the paint glows for a long time, hours I'm told.
     One interesting thing I will be looking into is a UV LED. I am hoping that it does not shine a light that I can see. (This shows how much I DON'T know about them as the LED light is purple!) I really am hoping that I can hide the UV LED in amongst the shrubbery of my models and have the light shine down on a large patch of fungi painted with glow in the dark paint.  This is so that when my models are somewhere where there is very little light source it will not mater. Can you imagine a patch of purple or blue fungi. Yummy!!!
 (NO! It only shines a spot light onto a very small section of the mushrooms. The rest don't shine.)

    I will put up more images once I have finished painting them. Also just to let you know I'm very dissapointed in the purple and the orange. The purple is being very tricky. I thought I had it glowing but now I've lost it. The orange doesn't glow at all. Need experimenting with. P.S. The trick with the purple is to have it thick and place it in the sun.
    

Pleated Curtains

I make pleated curtains for my models.

Thursday, 11 June 2015

Wallpapering Gourds

I thought some of you might be interested in how I wallpaper the inside of a gourd.

There are several stages to wallpapering the inside of a gourd the:-

First is to seal it. I seal it with Selleys PVA+ exterior Aquadhere glue. Allow to dry. The reason for doing this is that the gourd can leach a brown stain into the wallpaper, this prevents this from happening.

Second - Take plain white paper, I use art (acid free) paper and tear into small scraps (the size of 2-3cm piece) and glue all over the gourd surface. Do two layers. Allow to dry.

Third - Find a paper that you would like to use as the pattern for your wallpaper. The paper used for Archibald's bedroom was a paper and pattern made especially for miniature work. I chose that one because of the pattern it had no lines or defining areas. When it came to the lounge room of the room I have just finished in the hanging house I have used scrap-booking paper. These papers are interesting in that they are made up of layers. Taking these layers apart means that you can get both patterns, the one on the back and the one on the front.
This is Archibald's Bedroom and I have covered the walls with a wallpaper especially made for miniature work. This was the first time I had used wallpaper.
I is necessary to tear (you must NOT cut them or else you will see the edges) the paper in the same size as the white paper. Peel the scraps of paper apart so that you only end up with the top layer. This is not always as easy as it seems. As can be seen by the image below it is important to get rid of as much of the white undercover layer as possible.
Close up of the scraps of wall paper

Glue the paper allover the white paper.

As can be seen from the image below I have placed the pink flowers that were on the base of the paper I chose on the top of my room.

I then covered the main area of the wall with a grey pattern. The pattern I chose had lots of little blue butterflies all over it. This I loved and I tore each of them out of the paper and stuck them on over the top of it. I was quite worried that this whole concept would not work as it was a very patchy looking wallpaper but it has turned out brilliantly and I am extremely pleased with the finished effect. Even though I do find there is a gloss to the paper (because of the glue I have used) it still looks great. (When I can I will put up a photo of the finished room and you will be able to see that the wallpaper is there but not there). I am extremly pleased with it. I might be trying wallpaper paste next time as I want to use beaten mulberry bark next time.
Even though the paper looks scrappy it has turned out beautifully. I shall put up a photo of the completed room as soon as I can. 
This is the completed room. I'm extremely pleased with it. It is completely different from the style I am used to. I am now working on a little girl's bedroom. I am using wallpaper and beaten mulberry bark to decorate the walls.

Bugs, Bugs and More Bugs

BUGS!
Two finished bugs living permanently in my model.
 I, if you haven't already worked it out I have a lot of 'stuff' (although saying that I would love a lot more) In my mixture of 'stuff' I found a selection of Jones Tones Foils. I have had them for years and now I finally have something I want to use them for. Over the past few months real live bugs, covered in beautiful metallic armor, have been coming across my path and I thought WOW!. So hear I am making bugs out of buttons, seed beads and plastic fly screen.
A selection of Jones Tones Foils. 


I like to make lots of the one thing at a time. It makes it much easier when I am decorating a house.With this in mind I painted lots of round buttons and pink ? things with the gold size The good thing about the gold size is that it stays sticky for days until it gets covered in something like gold, foil or dust. I have not used the magic Art glue that came with the foil as it is so old that it has separated and is now unusable.


Placing the button with the sticky gold size onto the back of the foil (the side that is grey or silver in colour) the foil will then stick to the gold size. I have found that I like to mix the colours. So I 'pick' little bits of colour off the foil and onto the button. If you look at the bugs below you can see that they all have two colours, if not three, all over them. I then use the white gloves that came with the gold size to press the foil onto the sticky surface this is just to make sure it has stuck. I have also found that I can re-glue with the gold size if, for some reason, the foil did not 'take' in the first place.

One point to take notice of is to make sure that the underside and especially the edges of your 'bug' needs to be 'foiled' otherwise you will see them and spoil the look of the bug.


The bugs above have had their 'leg's added. You can choose how many legs and how long the legs are for your own bug  but for mine I choose six on each side. To get the 'legs' I just removed two lengths of fly screen (the plastic kind) and allowed two to stay to hold the legs together. You can make each leg individually if you would like. Glue these sections of leg in place. I used the Tiger Grip glue.

To make the heads I used dark iridescent beads cut in half and glued in place with Tiger Grip. The beads are not perfectly cut but I found that by gluing them in place the glue helped fill up the gap between the head and the body. Then once that glue was dry I then 'foiled' the head and the gap.

I used small black seed beads to make the eyes. I would have like to use large black micro beads but I didn't have any.

Once the whole 'bug' is dry I then covered it with gloss varnish this was to protect the foil. Once this was dry I then glued some of my 'bug's onto my models. I am extremely pleased with them and I intend to make many more as I now have some 'bling'. I am also sure that the foils will be used to make lots of other creatures that will end up living in my models.

Bubbles


The iridescent bubbles I purchased yeas ago.
I was looking for bubbles like the ones I purchased years-s-s-s ago in America. I wanted to buy kilos and kilos of them but no luck at the moment.

Soo in my desperation I went looking for other types. I came across a company called Potters in Victoria.


The first packet are 3mil pale blue beads.


From Potters I received three sample of micro-spheres. I'm really pleased with these and shall be purchasing 20 kilos (the smallest they sell them in) I shall also buy the last bead as well


Using them I have (so far) made a type of fungi with blue centers and


some insect eggs on the underside of leaves.


These are a grey 2mil bead and the moment I haven't used them but I'm sure something will come up.
Now I am really pleased I have come across these beads. Years ago I started making the glass eyed fungi. I had been given the beads by someone. They were used as Teddy weights. I was unable to find them and even though these are only the smaller of what I was using it is a start.
Now I'm really pleased with these 1.70mil beads


One other thing I have made is these red fungi. These have turned out to be quite a tricky thing to get to a point where I like them. They are made using the Yates tree flower caps (these ones are from when there was a drought). I then placed silver foil over them with gold seize. Glued the micro-spheres over them. I was not happy so I covered them in red nail polish on the top and red acrylic paint in gloss glaze over the stem and base. By the way the base is made out of the lower end of the plastic cord holders of blinds. Still not happy so covered them in grey glaze. Still no so covered them in black. GOT IT!

Banana Thread and Silk


Who would have ever thought you could make thread out of bananas and not just any thread but a thread that in some ways looks and feels like what I thought silk would look and feel like but doesn't.
The thread is so fine that it looks like hair and feels sooo smooth and silky. I purchased the banana thread from TexArt in England.
A variety of colours of banana thread.
I made these egg sacks (empty ones of course). My character has collected them placed them all around her bedroom. Later on I will actually have them located all over my models.

This is silk. The white silk is raw silk. The two packets in the middle is Tussa silk. The last packet is Mulberry silk.

Monday, 27 August 2012

Grant Workshop with Artslink


Last Wednesday (22nd August) I attended a workshop on how to go about getting a grant. What was different about this workshop was that I was able to do a 5min presentation of my work and then the next day sit down and talk about how I should proceed.
My new movable sign with a hanging house
with lights, plastic sleeves to hold leaflets
and of course my new name
Bramblewood - where secrets are hidden
and magic abides.
Overall the night was a great success. There were representatives from various departments that deal with funding. There was a remarkable young lady talking about Rabbit & Cocoon which is an art pre-sink she and two other people have set up at Miami on the Gold Coast.

At the end of the workshop I now have a clear idea on the way I wish to proceed.

The first is to put away all the little things I am doing at night (I build fungi and flowers for my models) and get out my hanging houses and work on them. My aim is to build 50+ hanging houses so that I can hold a huge exhibition. It will enable people to walk through the village as if they live there.

The second thing is to work on selling my skills. Not just my craft and art skills but also the skills I have with watergardening (which I have been doing for nearly 30 years). It was also suggested that I join Artslink and put a blurb about myself on their website. This website is available to anyone but especially to councils. The hope is that (as I am very happy to travel) that councils out west and others of course, will employ me to do a workshop.

I feel much better now as I have a better sense of direction.