Saturday, 2 December 2017

Exhibition - Do You Bee-lieve

I really should have put this post up a long time ago. I am just soo busy making mushrooms.
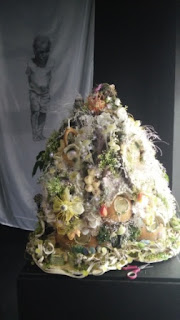
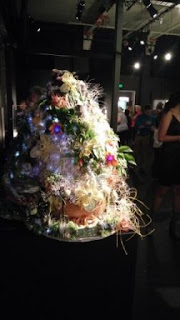
I am very proud to say that three of my hanging houses are presently at the display Do You Bee-lieve at Old Petrie Town, Brisbane. Queensland, Australia.

This is the second time I have been asked to display my work there and I must say Jules and Chris have out done themselves this year. There is a wedding this year between dragons!

I was asked to enjoy a day at one of the Tea Parties that are held before the exhibition is officially opened for the season.

I am soo pleased to be included in this.

Jules placing models into position.


Sunday, 8 October 2017

Exhibition at Judith Wright Centre of Contemporay Art

Well here she is, the model is finished and is presently sitting in the front window of the Judith Wright Centre of Contemporary Art. I am soo pleased. My first real exhibition.


The exhibition is call Fruit Salad.

Set up day on the left, opening night on the right. It was so exciting.
My artist statement.

Day time with lights on
Night time with lights on


This section of the blog was before the exhibition had started.  This model still has to be finished but I have the other three houses to finish for my other exhibition first. 

Earlier this year I did a workshop, held by Flying Arts, to see how to hold an exhibition because of that the entire group has been offered the opportunity of holding an exhibition. I understand that there should be about 20 artists, me being one of them.

The exhibition will be held at the Judith Wright Center of Contemporary Arts in Fortitude valley Brisbane, Queensland, Australia from the 3rd November to the 15th of December.

This is very exciting and I have offered two models but have suggested the the White House is the best, in my opinion, for this particular exhibition.

I have had to write an Artist Statement, that is a thing, honestly working out what do you actually do with your art gets the mind thinking and what your art is really about. I had to go back 30 years and think of the reason why I actually started making all these models in the first place. It was a place of refuge for me and even though I do not need to live in my fantasy world anymore, maybe there are other broken people out there at could.

Covering (hand made paper)for decking
 was added at Gold Coast Show
Windows (sequins, micro beads and rubber bands)
 were added at the Gold Coast Show
Then I needed to write a 50 word bio - strewth, summing ones self up in 50 words!


Exhibition at Lollipop Land

Time flies when you are busy and I keep thinking I should just quickly say that I have been invited to include three of my hanging houses in the beautiful display being held at Lollipop Land, Old Petrie Town, Brisbane, Queensland, Australia.

Jules came down to choose which three she would like and then I have been changing over all the lights so they can run on 4.5v and mains power for the three months they will be there.

I have put up photos of the houses chosen. I have finished the lights on two of the houses and have one to go and a week and half to change all the lights. I have also added a length of vine on top of them and they really look something. I am very pleased with them.

I call this the Berry House
This is Veeleeta's House.
This is the Shadow House

Tuesday, 5 September 2017

Gold Coast Show 2017 - What I Made

At the Gold Coast Show 2017 and what I made there

When I am at any show I like to make something. This time I was able to make the base of the wooden decking (is that what it would be called?) that surrounded the hanging house I am working on.
What I did first was nail and glue small sections of square balsa wood to the gourd creating an edge. I did this until the complete base was circled with them. I then cut pieces of flat sheet balsa wood so that it would radiate out from the gourd. These were nailed and glued to the edging. I then nailed and glued the sheet edging to more square balsa wood so that the outer ends of the decking were supported.
Once the wood work was completed I then covered the whole lot with hand made paper. I loved the texture and will colour it later.
Once that was finished I then worked on the windows.
This is the first version of the rubber bands used. I thought them too bright so changed them to the lighter colour.
The white stuff is the glue that has not dried yet. The base as the window is made from sequins covered in micro beads.


Gold Coast Show 2018

The Gold Coast Show 2017

I am very pleased to say that I have just finished exhibiting my miniature fantasy models at the Gold Coast Show, Queensland, Australia.
Everything went very well this year. I had thousands of people come and view my work and it is soo lovely to have a pat on the back for a job well done.
While I am at shows I like to make something (added to another post). One it helps me from being bored but more importantly I think it is good for people to see how the houses are made. There is also the fact that because they take soo long to do not taking advantage of being able to spend three full days making models would be mad!

Thankfully I was moved to this site, even though the glare through the windows was a worry. I had originally been placed further down the back of the building with a big wall in-front of me. This was much better as it was next to an eating area with a lot of people sitting down looking at my work. Much better.
I felt the display came up very well. It is a shame about the windows but I was not allowed to cover them up so I had to use a filter on the photo so I am sorry it looks a bit off with its colour.

Monday, 12 June 2017

Finally the Lights are Sorted

I have finally sorted out how to make the lights for my models.

When it comes to lights I have struggled to get them the way I would like but finally I have them sorted.
The main problem is that when I started over 25 to 30 years ago adding lights to my models I was using 12v (mains power using a transformer) and rice bulbs. These rice bulbs were soo hot that at one show one of my grape plants started to smolder. Terrifying!
So the next thing I did was change things to LED's but again still running them on 12v using mains power. (This proved to be very expensive.) Then a friend suggested I use batteries to allow me more freedom in placing the models at shows and schools. This led to doing 9v battery power.
Then came micro lights - well they changed everything!

They run on 4.5v and they are soo bright. Then I found strip lights (because I want to make lit mushrooms) and because they to run on 4.5v (when separated from the strip of 12v) and they are just soo bright which means I do not need as many lights to do the job. If you would like to read more please click on the read more button.

Monday, 5 June 2017

My World Sign for Shows

I was wondering through my blog and was surprised to find that I had not told you about how I made the My World sign I made to take to shows. So here it is.


The base of this sign is a large piece of core flute - the stuff that is used in real estate signs. Now because this stuff is plastic it doesn't actually like glue so you need to go a bit nuts with a sharp blade and slash it so that the glue will stick it self to the rough edges. I spread glue all over the base and waited until it was a bit sticky (hopefully preventing from to much of the glue from coming through the fabric to the front. I then placed the fabric on it and using my hands made sure that there were no air bubbles as I pressed it together.

Once you have done that I used material for the background.


As can be see in the photo there is a chain that I have attached around the whole sign. I have done this on both ends. This will be covered by the tree trunks made of hessian and will allow me to hang the sign. If you would like to read more please click here.

Friday, 26 May 2017

Using Strip Lights

USING STRIP LIGHTS
I think I have mentioned, more than once that, lights are the bane of my life. I realise it is my own fault, I keep changing things but what else would you expect from a person like me.

I decided to use strip lights because I wanted, and still do want to make, lit mushrooms and they use individual strip lights* so I went looking for some. Well there's a pickle. As with everything nothing is as simple as it seems. It turns out there are not just one type, no that would be too easy, there are stacks, some really tiny, tiny. If you want to know more info click here and it will take you to a website that explains it a lot better than I ever could.
If you would like to read about the reason and how I changed the LED lights in Pebble Cottage to Strip Lights click here.

My New Display Room

MY NEW DISPLAY ROOM

I am very pleased to show you my new display room. Below I will tell you how I have ended up with this amazing space. If you are interested in knowing this please click here.

Silkwood School Visit 2017

SILKWOOD SCHOOL VISIT 2017
Sorry about some faces being blacked out but it is, unfortunately in this world, a necessary thing.
I was very pleased to be invited, again, to Silkwood School to show and discuss my miniature models to the young children. If you would like to read more about it please click here.

Monday, 13 February 2017

Aaron Pocock's Exhibition

I thought I would show you this little gem I have just purchased. Granted the photo does not do the painting justice. This little piece has been painted by Aaron Pocock and he is having his very first exhibition and I visited him yesterday and this came home with me.
His exhibition is at Able Galley, Coral St, Loganlea, Brisbane, Australia. (Please note that the icon on google map is not in the right place. The Gallery is one of the white buildings above the icon (next to house number 29). He is there from 10am to 5pm for the rest of the week and he has a wide variety of artwork in an array of styles.

Why am I telling you all this? Well, one reason is to see if anyone wanted to go and look Aaron up - click here for more info and if anyone is looking to purchase some amazing artwork I think it would be well worth your effort to go and look at his amazing work.

The second reason is that I wanted to say that I have been unable to add anything more to my blog as I have had a bit of a disaster.

I have two craft rooms and one of those is in a leantoo attached to the house. The sealer around the roof has gave way and we ended up with sheets of rain water, on three sides, coming into the craft room. Many weeks later, and a LOT of work, that room is empty. All that could be saved has been neatly placed into the first craft room, that room had to be dismantled so that another rooms worth of craft supplies. could be placed inside it. Five truck loads of rubbish has been taken to the tip! Fortunately, my models were not in the room at the time. They are now in the front room and one of the bedrooms until we get a new roof.

I have removed all the climbing roses from the roof and just as I was about to start taking off the roof from the verandah, so I could get at the gutters, I was given a very large pond job! Today I am shifting 63 large Silver Perch into another pond in the hope that they will eat up the baby crayfish - that is another story!

One silver lining is that I have decided to make the empty room into a display area. So once the roof is sorted I will be able to take some of the shelving (which is right up to the ceiling) from the first craft room and place it at hip height and make a large display area for my models - just incase anyone wanted to come and have a look at them. They will also be easier to get at for when I take them to schools and shows.

See ya later.

Wednesday, 11 January 2017

Baby Noodles - How Cute!

Look at these aren't they amazing! I bought the lot!
Mini Noodle Sticks in three sizes
Have you ever seen the large Noodles that are used by people in swimming pools? Well now you can get baby noodles. Aren't they brilliant! They come in three sizes. 1cm wide, 1.9cm wide, 3.8cm wide.

At the moment I have been having a go with the 1cm wide noodle sticks and this is one of the things I have made. (see below)

To make these Cut them to the lengths I wanted, rounded off the top with sand paper then stuck a thin piece of wire up inside (it needs to be thicker). I then painted glue onto the pale blue noodle. It doesn't like this idea but I persisted. I then dunked it amongst the micro beads I like to use. These micro beads pick up the colour beneath them.

If you would like to read more about this post please click on the Read More link below.